WoWonder is a PHP Social Network Script, WoWonder is the best way to start your own social network website! Our platform is fast, secured, and it is being regularly updated.
WoWonder is the only social network in the market that fully support native mobile apps, thanks to our advanced API system!
- Do you have any questions? take a look at our documentation.
- Current Version: v4.1.3, View Full Change Log.
- Looking For Demo? View Demo (You can sign up with any random information.)
- Looking For Native Mobile Applications For WoWonder? Get All Applications.
- Now, You can import your current users from other social network scripts to WoWonder easily, Check it out!.

WoWonder is very easy to install,
Watch how to install WoWonderRequirements:
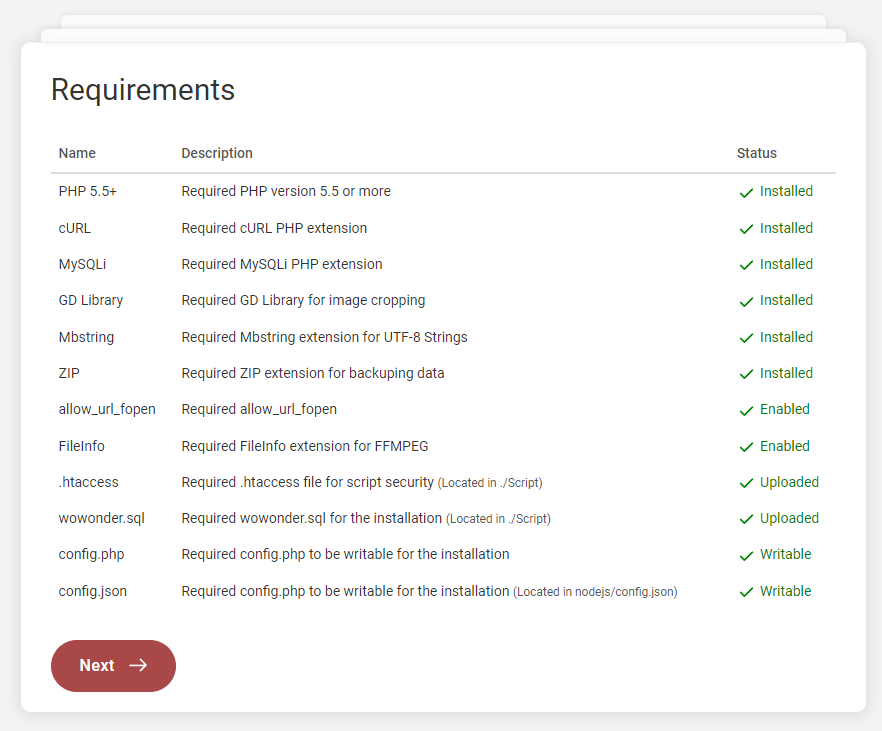
PHP 7.1 or Higher.
MySQLi.
GD Library PHP extension.
mbstring PHP extension.
cURL + allow_url_fopen enabled.
Installation
Follow the steps below to setup your site:
- Unzip the downloaded package and open the /Script folder to find all the script files. You will need to upload these files to your hosting web server using FTP or localhost in order to use it on your website.
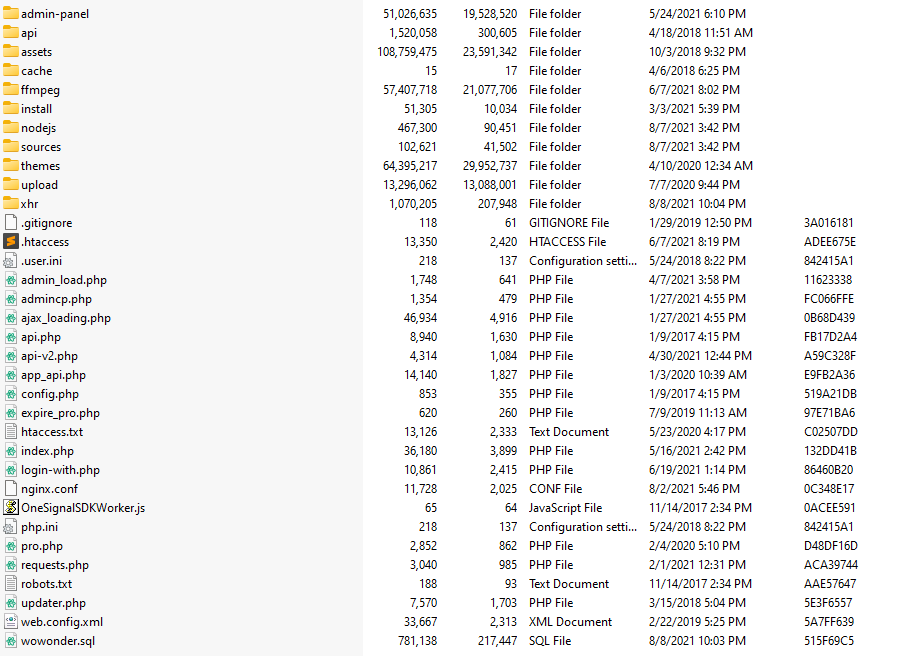
- Below is the folder structure and needs to be uploaded to your website or localhost root directory:
- You should upload all the files.
- Once you are done uploading, open your browser (Google Chrome is recommended).
- Go to http://www.YOUTSITE.com/install
- Agree the Terms of Use then click Next.
Important! Before we start the installation, please make sure you have the following installed on your server:
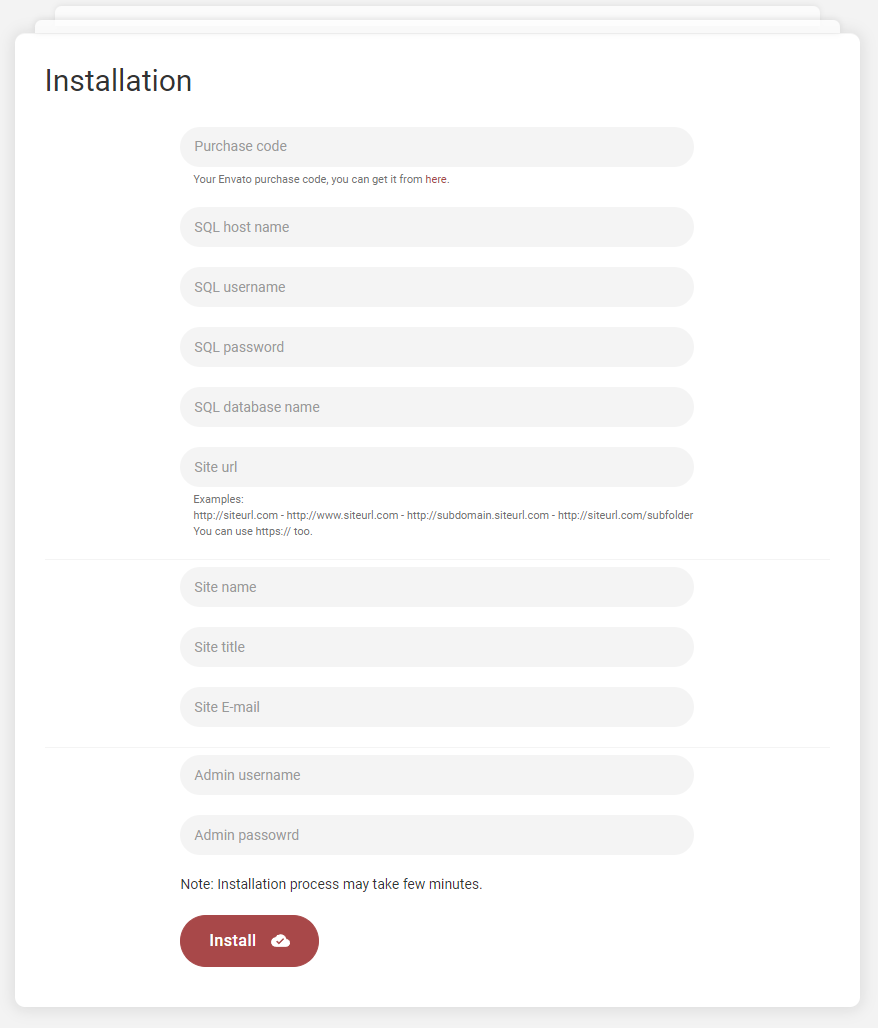
- In the second page, make sure to fill the required data:
- Purchase Code - Envato purchase code. What is this?
- SQL Host name - MySQL host name, e.g: localhost
- SQL Username - MySQL username.
- SQL Password - MySQL user password.
- SQL Database - MySQL database name.
- Site URL - Your Website URL, examples:
- https://siteurl.com
- https://www.siteurl.com
- https://siteurl.com
- https://subdomain.siteurl.com
- http://localhost
- https://siteurl.com/subfolder
- Site Name - Your site name, max 32 characters.
- Site Title - Your site title, max 100 characters.
- Site E-mail - Your site email, ex: info@yourdomain.com, Gmail or Hotmail is not supported. It should be one of your server's emails.
- Admin Password- Choose your admin password.
- Once you have wrote the information, please click the install button and wait for a while, the installation process may take up to 5 minutes.
- We are ready to go!
Hmm, using Nginx? if your server is using Nginx, please follow the last steps below:
- Open your server's root nginx.conf file, most of the time It's located it in: /etc/nginx/nginx.conf
- Open the home directory of the script, you should be able to find this file nginx.conf.
- Open the located file, and copy its content to your root nginx.conf file: /etc/nginx/nginx.conf
- If you find it something difficult to do, please contact your hosting provider, and they will do it for you easily.
What's Next?
Important! after the installation is completed, you have to set the cronjob, please use the command below and add it to your server's cronjob.
- Open linux terminal or login thru SSH.
- Run:
crontab -e - Add this code to the list:
*/5 * * * * php -f {PATH_TO_SCRIPT_FROM_ROOT}/cron-job.php > /dev/null 2>&1. - Replace {PATH_TO_SCRIPT_FROM_ROOT} with the full path to the file, e.g:
/home/playtube/public_html/cronjob.php - Save and exit.
- If you are using cPanel, please follow these steps and replace the file name with cron-job.php, and make sure the cronjob run once every 5 minutes.
How to Setup SSL?
Important! after the installation is completed, you have to set the redirections, please follow the steps below to setup SSL.
- Open .htaccess file located in root directory.
- To redirect your website to SSL, copy and paste the code below after RewriteEngine On
                                                                              RewriteCond %{HTTPS} off
RewriteRule (.*) https://%{HTTP_HOST}%{REQUEST_URI} [R,L]
- To redirect your website to www, copy and paste the code below after RewriteEngine On
                                                                                       RewriteCond %{HTTP_HOST} ^[^.]+\.[^.]+$
RewriteCond %{HTTPS}s ^on(s)|
RewriteRule ^ http%1://www.%{HTTP_HOST}%{REQUEST_URI} [L,R=301]
- If you made any changes above, last step is to update your domain name in
config.php file.
Color Schemes
You can change your Website's Color Scheme in an instant. You can edit from these locations:
- Main red colors from
Admin Panel -> Design -> Change Site Design ./themes/wowonder/stylesheet/style.css./themes/wowonder/stylesheet/style.css
Logo & Favicon Settings
The Logo Can Be Changed From Admin Panel -> Design -> Change Site Design
General Setup
A setup guide on configuring 3rd party services.
How to setup SMTP?
SMTP is used to send E-mails from your website.
- The first step of the process is to create an email account on your hosting package. This will be required for the SMTP configuration of your WoWonder website and it will also ensure that all emails from your website are successfully delivered to your users. You can create a new email account via cPanel.
- Once you have your email account created, you can proceed with the actual configuration of your WoWonder website. You need to access your website as administrator and go to SMTP settings from
Admin Panel -> Settings -> E-mail & SMS Setup -> E-mail Configuration - Edit the following options:
- Server Type - Choose SMTP from the drop-down box
- SMTP Host -mail.example.com (change example.com to your actual domain)
- SMTP Username - Enter the email account created in the previous chapter
- SMTP Password - Enter the password for your email account
- SMTP Port - SMTP server port, most used 587 for TLS, and 465 for SSL encryption
- SMTP Encryption - Choose SMTP encryption method
- I made the changes above but my website is not sending any emails, what I can do?
- Please test your SMTP credentials at SMTPER, if the same config worked by the test, please contact us.
How to setup FFMPEG?
FFMPEG is used to convert all video files to mp4 fomat. It is required if you want to upload other video files than mp4.
- We have included a patched version of FFMPEG in the script, located in ./ffmpeg folder.
- Go to
Admin Panel -> File Upload Configuration -> FFMPEG System Settings - Enable FFMPEG, the default path for FFMPEG will be ./ffmpeg/ffmpeg
- Chmod and change file permission of ./ffmpeg/ffmpeg to 0777
- Now, find Debug FFMPEG, click debug and see the results.
- If the video file was converted after debugging, then everything is ready, you can ignore the below steps.
- If you get broken video file, then you'll need to use your own server ffmpeg library, to install ffmpeg on your server, follow these links:
- Once you done with the installation, go back to
Admin Panel -> File Upload Configuration -> FFMPEG System Settings & Edit the following options:- FFmpeg binary file path - Write the path you installed ffmpeg on your server, mostly will be
/usr/bin/ffmpeg or ffmpeg
- Debug FFMPEG again, it should work fine.
- Important: Make sure shell_exec PHP function is enabled on your server.
- Try to upload videos to your website, if the video has been converted, then your site is ready!
How to setup NodeJS?
NodeJS gives the user the ability to chat, send messages and receive notifications in real-time.
Note: NodeJs is not required to run your script, if you are using shared hosting, or you can't get nodejs installed, you can still use the Ajax system (Default) in Admin Panel -> Settings -> NodeJS Settings
- You need to install NodeJS on your server to proceed, for more information about how to install nodejs, please read this documentation
- Install npm on your server.
- Once installed, You need to whitelist your nodejs port number, for more infromation, please take a look here
- Go to
Admin Panel -> Settings -> NodeJS Settings - Enable NodeJS
- If you are using SSL, enable NodeJs SSL Connection
- Enable Live Notification Bar
- NodeJS HTTP Port - Enter nodejs server's port number.
- NodeJs HTTPS (SSL) Port - Enter nodejs SSL server's port number (default 449)
- NodeJs SSL Certificate Key Path - Set the path to your domain SSL key path, .key
- NodeJs SSL Certificate Path - Set the path to your domain SSL key path, .crt or .pem
- To run your nodejs application on server boot and always, please take a look here: https://github.com/Unitech/pm2, replace app.js with main.js
- If you want to run the nodejs application, cd to ./nodejs folder and run
node main.js
How to setup OneSignal?
OneSignal is used to push notifications to the user, even if the WoWonder website is closed.
- Sign in to the Onesignal Console at https://onesignal.com/.
- Click on New App/Website
- Choose your app name and platform then click next.
- Fill the form with your website infromation, then click save.
- In next page, ignore the page and click on Finish.
- On top navbar, click on Keys & IDs
- Grab your OneSignal App ID & Rest API Key then go to
Admin Panel -> API Settings -> Push Notifications Settings - Edit the following options for Android & IOS:
- OneSignal APP ID - Enter the OneSignal App ID you created in the previous chapter
- REST API Key - Enter the Rest API Key you created in the previous chapter
- Note: Every platform requires a new app, for example you need to create a separate app for Android, and another one for IOS.
How to get Google reCaptcha key?
Google reCaptcha is required if you enable reCaptcha from Admin Panel, it is used to prevent spam accounts.
- Sign in to the Google reCaptcha Admin at https://www.google.com/recaptcha/admin.
- On the top right corner, click on the plus + icon.
- Fill the required infromation ahd choose reCaptcha v2, once selected choose "I'm not a robot" Checkbox
- Add your domain name, then click submit.
- Click on Subscribe to Test
- Fill the information then add the API to your app we created above.
- Grab and copy SITE KEY .
- Grab and copy SITE SECRET .
- Go to
Admin Panel -> Settings -> General Configuration -> Login & Registration Edit the following options:- Enable reCaptcha by clicking on the toggle.
- Recaptcha Key - Enter the site key you created in the previous chapter.
- Recaptcha Secret Key - Enter the secret site key you created in the previous chapter.
How to get YouTube API Key?
YouTube API is required for importing or posting YouTube videos.
- Go to the Google API Manager console and log in using your Google credentials.
- After this click on Create Project link for create new project.
- Enter Project Name and click on Create button.
- Select the project from the dropdown menu beside Google Cloud Platform.
- Click on APIs & Services then click on +ENABLE APIS AND SERVICES .
- Search for YouTube Data API v3 and enable YouTube Data API v3.
- Once enabled, click on Credentials, on the top nav-bar, click on +Create credentials then click on API key
- Grab the key and Click Close.
- Go to
Admin Panel -> Settings -> Website Information -> Features API Keys & Information, and edit the following options:- YouTube API Key - Enter the API key you created in the previous chapter.
How to get Google Maps Key?
Google Maps API isrequired for GEO and viewing Google Maps.
- Go to the Google API Manager console and log in using your Google credentials.
- After this click on Create Project link for create new project.
- Enter Project Name and click on Create button.
- Select the project from the dropdown menu beside Google Cloud Platform.
- Click on APIs & Services then click on +ENABLE APIS AND SERVICES .
- Search for Maps Embed API and enable it.
- Search for Maps Static API and enable it.
- Search for Maps JavaScript API and enable it.
- Once enabled, click on Credentials, on the top nav-bar, click on +Create credentials then click on API key
- Grab the key and Click Close.
- Go to
Admin Panel -> Settings -> Website Information -> Features API Keys & Information, and edit the following options:- Google Map API - Enter the API key you created in the previous chapter.
How to get Google Translate Key?
Google Translate API is required for to translate posts.
- Go to the Google API Manager console and log in using your Google credentials.
- After this click on Create Project link for create new project.
- Enter Project Name and click on Create button.
- Select the project from the dropdown menu beside Google Cloud Platform.
- Click on APIs & Services then click on +ENABLE APIS AND SERVICES .
- Search for Cloud Translation API and enable it.
- Once enabled, click on Credentials, on the top nav-bar, click on +Create credentials then click on API key
- Grab the key and Click Close.
- Go to
Admin Panel -> Settings -> Website Information -> Features API Keys & Information, and edit the following options:- Google Translate API - Enter the API key you created in the previous chapter.
How to get Yandex Translation API key?
Yandex Translation API is required to translate posts.
- Go to the Yandex API Manager console and log in using your Yandex credentials.
- You need to update your information and enter your credit / debit card information.
- Click Create new key in the top panel.
- Click Create API key.
- Enter a description of the key so that you can easily find it in the management console.
- Copy the ID.
- Grab the key and Click Close.
- Go to
Admin Panel -> Settings -> Website Information -> Features API Keys & Information, and edit the following options:- Yandex Translation API - Enter the API key you created in the previous chapter.
How to get Yandex Maps API key?
Yandex Maps API is required to show maps instead of Google.
- Go to the Yandex API Manager console and log in using your Yandex credentials.
- Click the Get key button
- Enter the key name and connect services JavaScript API, Geocoding API.
- Copy the API key.
- Go to
Admin Panel -> Settings -> Website Information -> Features API Keys & Information, and edit the following options:- Yandex Map API key - Enter the API key you created in the previous chapter.
How to get Giphy API key?
Giphy API is required to send and post gifs.
- Create a GIPHY API Key by clicking Create an App on the https://developers.giphy.com/dashboard/ (you need to create an account first).
- Choose SDK and click Next Step.
- Enter Your App Name, App Description and click on Create App button.
- Grab the API key.
- Go to
Admin Panel -> Settings -> Website Information -> Features API Keys & Information, and edit the following options:- Giphy API - Enter the API key you created in the previous chapter.
How to get Adult Image Filtration (Google Vision) API key?
Vision API is used to filter adult content by bluring the post, or deleting it.
- Go to the Google API Manager console and log in using your Google credentials.
- After this click on Create Project link for create new project.
- Enter Project Name and click on Create button.
- Select the project from the dropdown menu beside Google Cloud Platform.
- Click on APIs & Services then click on +ENABLE APIS AND SERVICES .
- Search for Cloud Vision API and enable it.
- Once enabled, click on Credentials, on the top nav-bar, click on +Create credentials then click on API key
- Grab the key and Click Close.
- Go to
Admin Panel -> Settings -> Post Settings -> Post Settings -> Adult Images Settings, and edit the following options:- Enable Adult Images Filtration by clicking on the toggle.
- Vision API key - Enter the API key you created in the previous chapter.
How to enable weather widget and get OpenWeatherMap API?
OpenWeatherMap is used to show users current weather based on their location.
- Go to the Weather API console and log in using your OpenWeather credentials (Or create account).
- Once you are logged in, go to https://home.openweathermap.org/api_keys.
- Find Create key and enter your website name then click Generate.
- Grab the key from the left table.
- Go to
Admin Panel -> Manage Website Features -> Enable / Disable Features -> Weather Widget, and edit the following options:- Enable Weather Widget by clicking on the toggle.
- Weather APP ID - Enter the API key you created in the previous chapter.





![Create A Responsive Personal PORTFOLIO Website Design Using [ HTML CSS JS ] In Nepal](https://blogger.googleusercontent.com/img/b/R29vZ2xl/AVvXsEhdPSoxYr3800fLRjLdzKSrCeILiITnYnuauKbc6WHa76yv2PVwi9zCef5b0xiKLBlAnPsY3bKPlbNDNl9iwezJM0MA3EgxPd3DSBpeO42DROcJgtEQVWUMSyvjvw7dTNqr39lq2SLMbRX_3Qvyhzg7WuRmzSfQsnpPqgN18WmIuh8IVchk4rs6QTm2YQ/w100/darling.png)



0 Comments